How to Migrate WordPress Site from HTTP to HTTPs?

How to Migrate WordPress Site from HTTP to HTTPs?
Do you want to transfer your WordPress site from HTTP to HTTPs?
Google is trying to spread HTTPS across the web to make the internet safer and better place. Google has started to tag every HTTP website as “not secure”. That’s the reason you must migrate your WordPress site as soon as possible for better performance and result.
In this article, we are going to learn how to migrate WordPress Site from HTTP to HTTPS.
What are HTTP and HTTPs?
HTTP stands for Hypertext Transfer Protocol. It is a protocol used on the World Wide Web that defines how data and information are transmitted and communicated from a web server to the browser to view web pages.
HTTPs stands for Hypertext Transfer Protocol Secure that uses Secure Socket Layer(SSL). Alternately, it is a secured form of HTTP. So, it makes your WordPress site safe from hackers.
Why You Must Migrate WordPress Sites from HTTP to HTTPs?
The data transferred from HTTPs is secured via Transport Layer Security Protocol(TSL). Hence, it ultimately makes your site safer. Search engine ranks HTTPs page higher than HTTP page when two pages are equal in terms of SEO. Furthermore, Google has announced it as a lightweight ranking signal. It also helps you recover the loss of the referral data since referral data is lost or not passed when an https WordPress site is passing data to an HTTP WordPress Site. The all e-commerce WordPress website must have HTTPs and SSL installed to accept payment. Therefore, you should migrate WordPress site from HTTP to HTTPs as soon as possible.
Migrate WordPress Site From HTTP to HTTPs Using Plugin
It is an extremely easy and fast method. Beginners are recommended to migrate WordPress site from HTTP to HTTPS using plugins. It saves you a considerable amount of time and effort.
All you have to do is install a Really Simple SSL plugin and it will take care of rest of the work. Upon activation of the plugin, it will check the SSL certificate, configures WordPress to use HTTPs URL’s and sets up redirects for HTTPs from HTTP URL. It also fixes the mix content error.

Note: The plugins have negative effects on the performance of your site. It will slow down your site because it replaces the URL while your content is being loaded. Also, deactivating the plugin can cause the mix content error in the future. So, you will have to keep the plugin activated all the time. That is why you should transfer WordPress website from HTTP to HTTPs.
Migrate WordPress Site From HTTP to HTTPs Manually
First of all, purchase an SSL certificate from your web host or any other authenticate company. Some web host companies such as Blue host, Dream host offers free SSL certificate.
After you have successfully installed an SSL certificate, jump into the process of moving the WordPress site from HTTP to more secure HTTPs.
Change URL into HTTPs
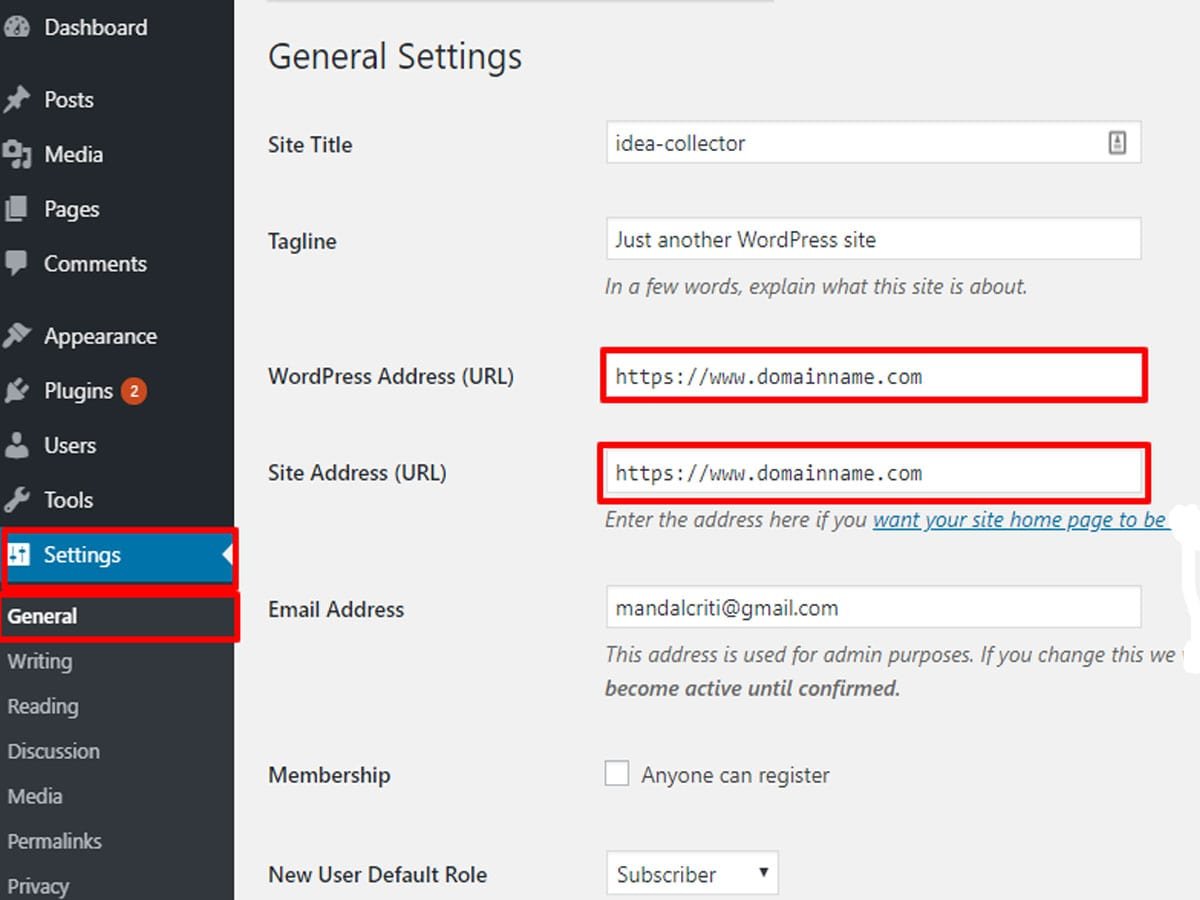
- Go to your WordPress admin area>>settings>>General.
- Change your WordPress address URL and Site Address URL from HTTP into HTTPs.
- Save the changes.
You will be automatically logged out from the WordPress admin area. Keep on reading the post to migrate WordPress site from HTTP to HTTPs.
301 Redirect from HTTP to HTTPs
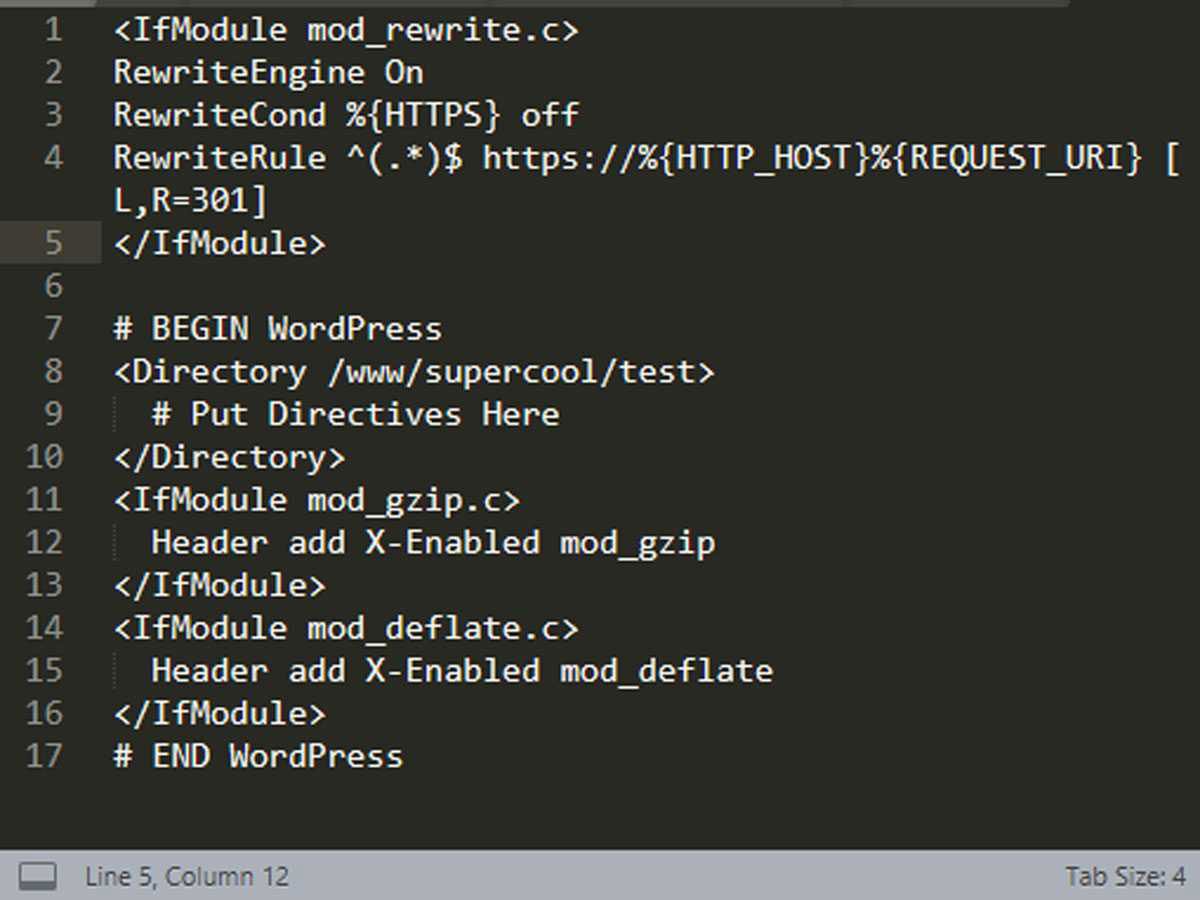
Next thing you have to do it set up a 301 permanent redirect from HTTP to HTTPs. It is the most important step required for migrating WordPress site from HTTP to HTTPs.
- Login to FTP or FileZilla app in cPanel dashboard of your hosting account.
- Locate the .htaccess file and right click it and select edit.
- Now, copy-paste any one of the codes given below right before #Begin WordPress.
<IfModule mod_rewrite.c>
RewriteEngine On
RewriteCond %{HTTPS} off
RewriteRule ^(.*)$ https://%{HTTP_HOST}%{REQUEST_URI} [L,R=301]
</IfModule>
If you are on a server then add the following code instead.
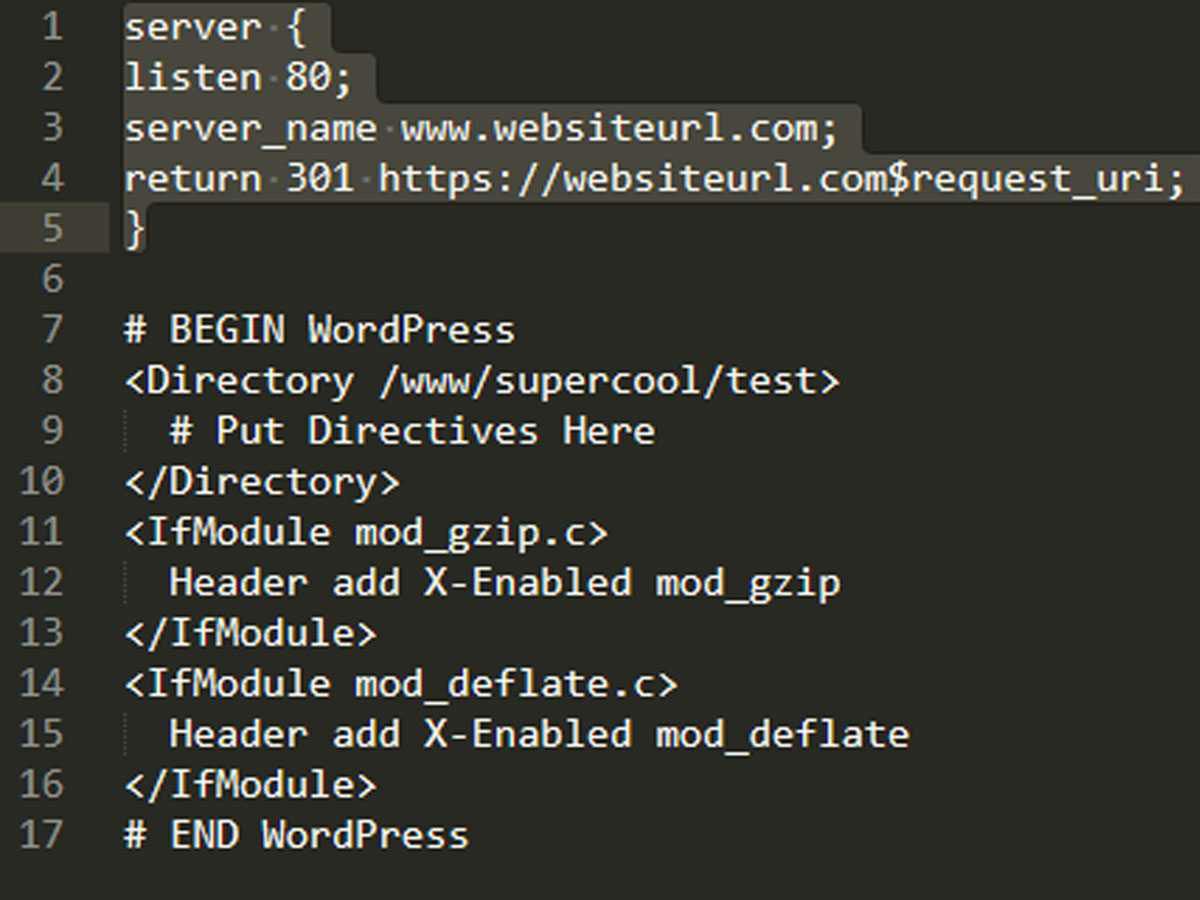
server {
listen 80;
server_name example.com www.mysterytheme.com;
return 301 https://mysterytheme.com$request_uri;
}
Force the SSL and HTTPs on the WordPress Dashboard.
Next, you need to configure SSL in the wp-config.php file in order to force the SSL and HTTPs on the WordPress dashboard.
- Login to FTP or FileZilla app in cPanel dashboard of your hosting account.
- Locate the wp-config.php file and right-click it and select edit.
- Copy-paste the following code in the wp-config.php file right before the /* That’s all, stop editing! Happy blogging. */ line.
define(‘FORCE_SSL_ADMIN’, true);
Now type your websites URL of the HTTP version and see whether it redirects to your HTTPs WordPress or not.
Mixed Content Issues
You are likely to face issues if you are migrating WordPress site from HTTP to HTTPs for the first time. The mix content issues occur when a CSS, JS, image, video files are loaded from an HTTP location instead of HTTPS location.
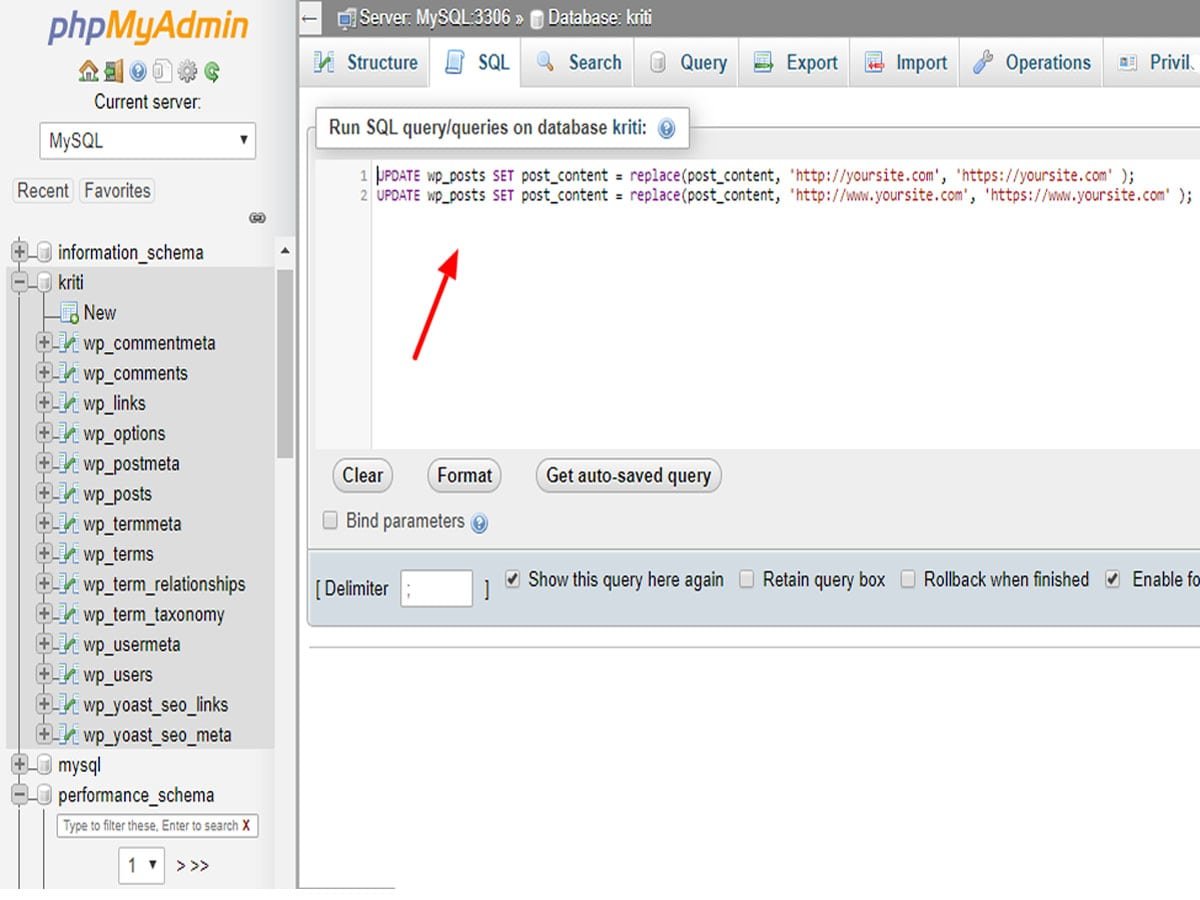
At first, locate the source of issues using the inspect tool. Find all mentions of your old HTTP URL in the database and replace it with your new HTTPs URL. Replacing HTTP link with HTTPs link can be quite hectic. Hence, you can do it easily using cPanel.
- Log into cPanel and go to phpMyAdmin in the Databases section.
- Click on the WordPress database.
- Copy-paste the following code in the SQL of phpMyAdmin.
UPDATE wp_posts SET post_content = replace(post_content, ‘http://yoursite.com’, ‘https://yoursite.com’ ); UPDATE wp_posts SET post_content = replace(post_content, ‘http://www.yoursite.com’, ‘https://www.yoursite.com’ );
That’s it. All your old HTTP URL are automatically changed into new HTTPs URL manually.
Changes in Google Search Console
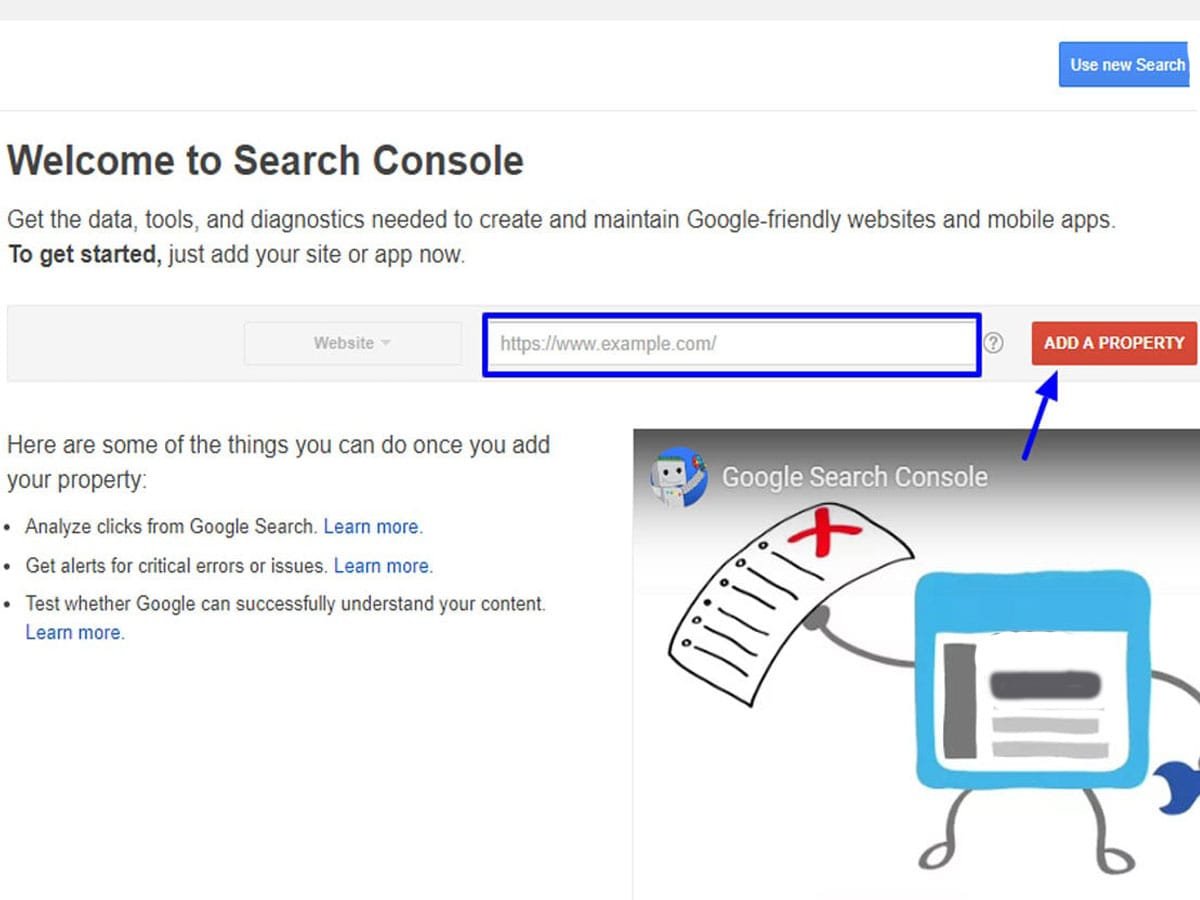
When you migrate WordPress site from HTTP to HTTPs, Google considers HTTP and HTTps as two different websites. Thus you might face some SEO issues. To fix this you must let Google know you have migrated your site from HTTP to HTTPs.
- Sign up or log in to your google search console account.
- Click on add a new property button.
- Now, add your website HTTPs URL on the popup box and click on add.
Now, verify the ownership of your website. You have successfully migrated the WordPress site from HTTP to HTTPs. Now, you can see the secure green padlock on the URL of your website.
Wrapping Up
To wrap up, you can easily migrate WordPress site from HTTP to HTTPs by following the complete solution described above. Hope you find this post helpful and comprehensive.
What’s your thought about the transfer of WordPress Site from HTTP to HTTPs? Write to us on comment and follow us on Facebook.
2 thoughts on “How to Migrate WordPress Site from HTTP to HTTPs?”